A Simple Mud Pot Painting

 Decorate your interior with your creative work. Try this a mud pot painting. 
Enjoy crafting :)


Materials Used:
       * A mud pot.
       * Acrylic colors.
       * Metallic color tubes.
       * Painting brush.
       * Varnish.


Instructions:
         * If you try this first time, then you think simple and creative.
         * Choosing a colour combinations is also important.
         * Choose your favour colour and paint it to whole pot completely.
         * Paint flower shape on mud pot and give outline to flower shape using metallic colour tube.
         * Choose a contrast color for final touch(rough painting) to your pot. Like in the below image.
         * Finally, you can give a thin out coat of varnish, as your wish.


Make it yourself. Enjoy surfing Oviyams. Thanks for visiting.
Hope you like this.
Your suggestions and comments on this are very appreciated.

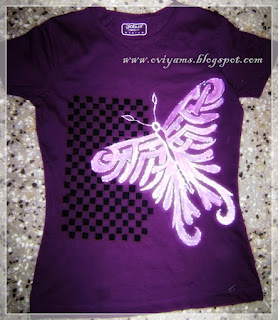
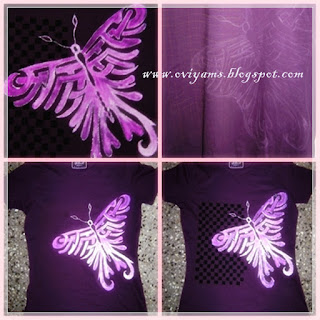
Fabric Painting on T-Shirt

Make your plain T-Shirt into colorful with your creativity. I just did some painting on my shirt to give a new look . You can also try and give new look to your apparels.

Material i used are:
- Acrylic or Fabric paints
- Brushes
- 3D glitter liner


Tips:
- Wash your fabric to remove starch from the cloth.
- Draw out line of your selected design to painting. (Can use crayons)
- Draw a very tine lines for design.
- Choose your color and do not mix water in that. It will give a long life for your painting on fabric.
- Before starting painting use paper or something to backside of your fabric to avoid spread paint back side of your fabric.
- Start painting on your fabric gently.
- After complete painting leave it 20 to 30 minutes to dry it out.
- Give outline of your design with 3D glitter liner. Its gives a complete design to your fabric.
- Iron on the reverse side of your fabric.
- Wash your fabric before you wear.

Hope you will enjoy painting your fabric. Yours comments / suggestions are highly appreciated.


Tissue Paper Roses Making

These wonderful roses are made out of tissue papers.
Would you like to try it out?


Only few easy steps to make a tissue paper roses

This image will be helpful to make you roses better.
Making Petals for Roses:
- Take a tissue papers and cut it in the shape like liquid drop .These drops are to make the petals of our paper rose.
- If have chosen white and red color,You can select other colours also.
- Prepare a mixture of you favorite color into water and dip your tissue petals inside the color water and  leave it to dry completely.
- separate your petals layer by layer. please be careful while separate your layers

Making Roses:
- Take a stem to make a rose.
- Start to arrange your tissue petals one by one in the stem.
- Tie your petals tightly with the help of thread.
- Now your roses are ready. Using a floral tape you can cover your stem.

Now you can use these paper roses to decorate your walls,Flower vase.


Hope you would like this.Yours comments are highly appreciated.
Have a great day ahead!!

Making Pen Holder Using Ice-cream Sticks

It is interesting to make your own pen holder using ice-cream sticks. Just you try it.


Materials:

* Ice-cream sticks
* Fevicol or quick fix
* Thermocol or cardboard for base
* Poster / Acrylic Colors

Instructions:
1. First you decide the width of your pen stand  and strick the ice-cream sticks together as shown above.(You can select your pattern for your pen holder.I have placed them vertical)
2. Take a thermocol sheet or cardboard, And cut it to the required size as to form the base of the pen stand.
3. Fix it into the base of your pen holder.  
4. Paint the sticks with your favour Poster / Acrylic color and make the design/pattern is you wish.

Now your pen stand is ready :) .  

Hope you like this.
Any comments and suggestions are highly appreciated.

Also see making pen holder using wedding cards

Thanks for visiting!!

A Simple Tomato Carving

Make your Lunch / Dinner more special  by decorating them and please your beloved ones. 

There is a simple way make your special occasions much more special using tomato's.


A few steps to make a tomato flower to decorate your special recipes.


1. Take a hybrid tomato and cut it vertically.
2. Take a one part and slice it into thin layers.
3. Spread the sliced tomato's as shown in the image. 
4. Place them to form a round to form a flower (like a first image).
Hope you like that?

Any suggestions and comments on this are appreciated.

Photo Frame using ice cream sticks craft

Ice cream sticks photo frame craft:


Material I used:
      - Ice cream sticks
      - Thermocol balls
      - Chart paper
      - Poster colors
      - Metallic color tubes
      - Glue 
      - Scissors.

Instructions to make:

 1. Take 4 ice cream sticks and stick them together to form a square using glue/ gum.
 2. Make one more square of same size and then join both square  as shown above in the image, now your basic frame is ready. 
 3. Cut the square shape in chart paper and attach in the back side of basic frame. 
 4. Take a chart and draw flower as many as you need.
 5. Cut the outline of flower and colour them with your favorite sketch pen/color pencil. 
 6. Attach your flowers in basic frame and place thermocol Ball in the center of the flower.
 7. Now you can decorate your frame base, stick the favorite photo in that base.


Please post your comments and suggestions ...

Thanks for visiting...
Have a nice day ahead!

Fabric Painting

Fabric painting with the help of vegetables.

Take a potato and  cut it with the help of knife, shape like a flower petals . Apply chose color on that petal shape potato, and press into your cloth. You can see Saree border in below  image.

You need a,
   Saree / kurta or table cloth.
   Fabric paint colors.
   brushes.
   vegetables (Potato or carrot )

Tips:
    - When you are painting place waste newspapers on the back side of your cloth material , because the paint should not spread to other places of your material. You can remove it after the paint dries out.
    - Iron your printed material after it dries out. Now your prints sticks firm to cloths even after many wash.

Do you feel this interesting? Please post your comments.


Creative Wall Hanging Using Table calendar

Do you like the beautiful pictures in your table calendar?  Don't want to throw those...
then I have a simple idea to decorate your wall with those pictures.

It's very simple even your Kid can create this very well... 
I got a great response from my friend and family for this hanging craft. See below if you like that you can try it yourself.

Everybody had lots of old table calendars in our home like this.Then you can try this beautiful wall hanging.
You need:
 A table calendar,
 Glue,
 Scissors.

Steps:
- Select your favorite picture it can be from a table calender or from any of your magazines.
- I have used a table calender to decorate my wall.
- Remove the spiral and separate each sheets.
- Cut all pictures your favour shape with scissors.
- Stick all pictures one bye one with help of glue as shown above.

You are almost done.All you need to do is select the place and hang/paste it.

Do post you suggestions and comments.

Valentine Wall Hanging Craft

This valentine wall hanging is vary easy to make. You can gift to your beloved one. It's completely Eco-friendly craft.
May you be showered with love,
all through the day,
Happy Valentines day wishes 


Materials used:
Pressure Cooker gasket
Fabric for rose making
Nylon net bag (you got it from buying veggies or fruits)
Thermocol

1. Make fabric roses as many as you want.(Choose which color you want)
2. Take a gasket and cover with fabric and hand stitches the ends ,so that is covers the gasket. 
3. Fix your fabric roses with fabric covered gasket.
4. After fixing roses, cut small rectangle shapes of nylon net. 
5. Stitch it both sides of fabric roses like the above images.
6. Cut the Heartine shapes in thermocols as shown in the above images.
7. Make a colorful hearts  and fix it how you like. 
8. Now you can gift it to your valentine.
Thanks for visiting OVIYAM

My Latest Glass Paintings

Its all my very lastest glass paintings.


Peacock fairy


Lord Ganapathy


"Flower Vase"

Keep surfing oviyam.
Have a great day ahead .


Oviyam on Facebook

I have created  my  new page on facebook.

Visit  Oviyam on Facebook  page, If you like or impressed my  paintings, art and craft work? Please join on social plugin.

give your great support to me..
Thanks a lot to all my visitors


with luv
Isai

Clay Statues Painting

You can give a lively look from your raw object. But you need a great patience and skills. You try it yourself and give a livily look to your statue ...  like this !!!
See the statue before and after painting 


Got the colorful great look ...  One more sample for you..


Instructions:

1. Choose an acrylic colors.
2. Squeeze some paint onto a palette.
3. Mix an acrylic retarding medium with the paint to extend the drying time. This gives you more time to work.
4. Use water to make the paint flow, as acrylic is a water-based paint.
5. Dip your brush into water then the paint. Brush the paint onto the sculpture using even strokes. Allow it to
dry then add another layer of paint and very heedful on borderline where the color variations.
6. Don't touch until it dries completely.

Thanks for visiting .
Have a nice day :)

Mirror Decorating Idea

Its a very simple idea for decorating your mirror. See the below image.


Its easy for you to try.
Things you need to decorate your mirrors
1. Metallic color tubes
2. Two or three different shades of glass color.

Procedure:
1.Draw the outline of the design with Metallic color tubes on the mirror.
2.Fill with glass colors in your design as you wish.
 
Now you decorated mirror is ready to be placed in your dressing table.


We appreciate your comments and suggestions.

Awesome Henna designs For Hands

Mehndi design for bridals and girls.
Decorate you palms and feets on special occasions and marriages.


Thanks for visiting.
Keep watching more mehendi designs to be published shortly.

Recycle Bottle Into Flowers Vases


Can you imagine, this glass flower vases was a honey bottle .... Yes!
I thought to give a new appearance.. That's this flowers vases ..

Steps:
- Draw with glass colors on the bottle .. Pictures or images of your choice
- Make a fabric roses and decorate your beautiful flower vases.

Thanks a lot
Enjoy visiting OVIYAM

Making Beautiful Fabric Roses

Hi
    These wonderful and beautiful flowers can be used for decoration in your parties, use in gift wrapping, embellish hats and more... its very EASY to make :)


Needs:
- Cotton or satin fabric strips of your favorite color.
- Floral Wire & Floral tape.
Steps:
- You start on the right end of the ribbon.
   Fold it downwards about 1 inch (45 degree angle).
- Start rolling going left, this will  form your rose center roll.
- Roll about two circles.
  Start by taking the long end, and fold it backwards, and wrap it around the center.
   Shape it into a rose as you go.
- While one hand is wrapping, make sure the other hand is holding the bottom stem part. Never let the stem go, or it will become loose.
- Repeat until you have about 1 inch of ribbon left, fold it in half, and wrap it around the stem that you started with in the beginning.
-You can wrap clear tape around the stem so that it will not loosen. Take your green wire and stick it in the ribbon stem part.

Now your rose is ready to use for decorations.

Thanks for visiting .
Have a wonderful day!

HAPPY PONGAL

Wishing you a very Happy and Prosperous Pongal to all my visitors.

இனிய பொங்கல் நல்வாழ்த்துக்கள்... 
அன்புடன்
இசை  

Egg Shell Art


My egg shell art.
I hope you liked these.
Have a great day ahead...

Ganapathy Painting

Image of 'Ganesh' a indian god , used pearl and metallic colors for painting ,small stones and mirror pieces for decoration.

Making Pen Holder using wedding card

Do you have lots of waste wedidng cards and CD's.Can be used to keep your Pen,Visiting cards etc.
Did you like this?.
Try it yourself .